- Your cart is empty
- Continue Shopping
Forum Replies Created
-
AuthorPosts
-
brach
ParticipantThank you for the photos. Sorry it’s taken a few days to get back to you, i’ve been really busy.
I don’t see anything directly in the photos that I think could be the issue, but i do notice that a lot (maybe most) of the solder joints have about twice as much solder on them as they should have. Please try to re-flow the solder joints with a clean tip (without solder on it) to see if you can remove some of the solder from those joints, and to ensure that everything is making a good electrical connection. As an example of what i’m talking about, look at the solder joints of the relay, they look more spherical instead of the “concave conical” shape they should have. In fact, the joints on the relay could be causing this problem.
I couldn’t tell too well because some of the photos aren’t in great focus, but it kind of looks like there are little extraneous pieces of solder around the top of the circuit board. These need to be cleaned up because they will cause shorts. You can use your soldering iron to pick them up.
Can you please double check to see if R28 has close to 0V on it? If so, please re-flow the solder joints on the ISP pins, because R28 is connected to some of those pins, and they could be shorted or something. If that doesn’t work, then remove C17 to see if that makes a difference with the volume. Removing this cap will bypass all the signal muting circuitry, so you can see if that is causing the problem.
-BrachParticipantOh, that’s great!
I forgot that you had installed sockets. I’m glad that you remembered that I said that earlier. Sockets are good for some applications, but they don’t do well with components that deal with sensitive and small signals. I guess it’s a good lesson to take with you in your future projects. You’re right, I probably should mention that in our assembly manual. Thanks for the suggestion.
I’m really glad that you are also enjoying the VPM-1.
Take care.
-BrachParticipantJeff,
I know this has to be really frustrating…to get it working and then it stops again. I’m sorry has been such a long battle.
When you hear the high frequencies muffled…this particular symptom is caused because the signal is not making it through the “high” side circuitry. Please check the high side trim pot by working through appendix A, step a, v and vi (don’t bother with the previous steps). I would even start with the “wiggle test.” It’s an intermittent issue and I’ve experienced the trim pots can sometimes be intermittent. While the high side isn’t working, you can also check to see if there is around 1.8V on the optocoupler pin, as in the voltage chart. This will tell us if the trim pot is actually the issue.
Let me know what you find.
-Brach
Ps…I’ll let you know if and when I’m able to accept service work again.Participanttwentyone,
Remember that when you measure across the test points, you are actually measuring the resistance of the LDR, not the trim pot. Are you able to lower this value when you turn the trim pots?…you may have to turn them a lot to notice any change (they are 25 turn pots).
The voltage on pin 5 is fine for now…It can actually be that low and still be fine.
-BrachParticipantThanks for getting back to me about the voltages. The IC voltages are fine for now. I think your problem is with R28…or at least the lack of voltage there is the symptom of the problem. I want to focus on getting that fixed.
Sorry about the photo hosting issue. You have to upload your photos to an external site (like “google photos” or something) and then link to them here on the forum. I know it’s a pain, but this forum software makes us do it that way
-BrachParticipantYour description of the pins is very confusing to me. The IC pins are numbered on the voltage chart on page 1 of the troubleshooting guide. It would be very helpful to me if you could list the pin number and then it’s voltage. It’s much easier if you just measure the pins from the top of the board (not the solder side). make sure to use a solid ground point for the black probe of your meter.
If you get 0V on R28, that’s a major problem. The red pad in the volage chart should be 5V. That could explain why you get very low output. Once again, please make sure that voltage reading is correct, with the black probe on a known, solid ground point.
It might be helpful if I could see your board and solder joints. If you could take some detailed, in focus photos of both sides of your board, with special attention shown to the solder joints (even under the pots), I might be able to see something that could be causing the issue.
-BrachParticipantSince it’s not passing audio correctly, work through step 6, A-E to see if you notice anything wrong.
Let me know what you find.
-BrachParticipantAndy,
Sorry about this trouble.
Your idea to re-flow the solder joints was good. That would have been my first guess. I know that the problem has to be somewhere in the analog signal path…it could be anywhere from the beginning of the circuit to the output.
Does the signal sound fine through the pedal when it is bypassed (when the red led by the bypass footswitch is off)?
What are the results of your tests of step 6 in the troubleshooting guide?
-BrachParticipantThanks for your question, but I don’t really have any suggestions because I’ve never used it for bass guitar. Theoretically, it should work because the circuit accepts very low frequencies. The suggested trim pot settings would be a good place to start…but I expect anyone who builds a Quaverato to mess around with these until they like the sound…same is true for anyone building it for bass guitar. You’ll have to experiment with the dip switch settings. You may like how it sounds with the suggested settings, or you may want to set the crossover point to a lower frequency, and then play with the ratios of highs to lows with the trim pots. Sorry I can’t give you more specifics.
Good luck!
-BrachParticipantEither of those types of pads would probably work. Feel free to experiment.
The output impedance is around 6K ohms.
Good luck.
-BrachParticipantI’m sorry about your Cortado’s sensitivity issues…It is a sensitive piece of equipment. The easiest solution is to use mechanical dampening to reduce the sensor’s ability to detect vibration. Try wrapping it in cloth or high density foam or potting it with hot glue or something to stifle the vibrations that get to the disc.
The MkIII does have a pad, if you are interested in that.
Please don’t confuse “sensitivity” with “head room.” By turning the pot all the way down you are reducing the bias voltage on the FETs causing them to loose a lot of headroom. Reducing the phantom power voltage will only reduce the headroom too…it will still be just as sensitive, but it can’t pick up as large of signals without distorting.
I can’t remember what the frequency response is off the top of my head. The output impedance is a few thousand ohms…I’m sorry, I don’t remember specifics.
-BrachParticipantAt which step did you get stuck on the troubleshooting guide?
-BrachParticipantThat’s good! I’m glad it was that easy. I’m sorry, I forgot to mention that in my previous troubleshooting post. I probably should mention that the cables should not be twisted in the troubleshooting page of the manual, if it’s not already there. I know I mention it somewhere in the manual, but it probably should be more prominent.
Anyway, I’m glad you figured it out and i’m glad it didn’t take any soldering re-work.
Hopefully, now you can enjoy your Altura!
Take care.
-BrachParticipantThis is probably a case of the 5V rail shorting to ground somewhere/somehow. With the power removed from the board measure the resistance between the 5V pin on the regulator (the one currently at .8V) and ground. I’m guessing it’s probably some very low resistance. If so, scan the entire board with a magnifying glass looking for any speck of solder or short that could be keeping that rail at ground potential.
If it’s not some very low resistance then the voltage regulator may be bad. Un-solder and pull up the 5V lead off the board and measure the voltage on that pin when it’s not connected to anything. If it is still not at 5V then the regulator is most likely bad.
But also make sure the center pin of the regulator is really connected to ground.
…before everything else make sure the voltage regulator is orientated properly and it’s the correct part (not a 2N3904).
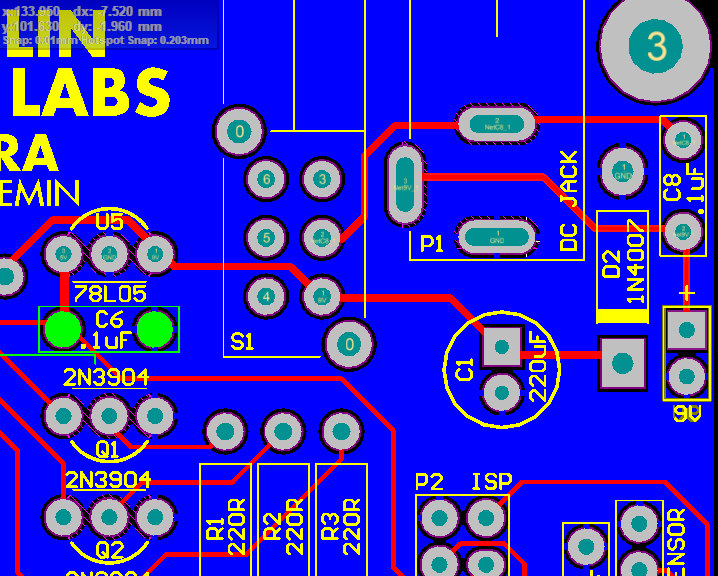
-BrachParticipantThank you for the picture. That is very helpful.
Here is a picture of the traces on the PCB (in red). Make sure you are getting continuity between all the points on the switch and power jack which should be connected. It seems like there may be a broken trace from the jack to the switch. You probably will need to use the pointy end of the meter’s probe to dig into the solder joint to get past the layer of flux, so you can get an accurate reading. If you do find there is a broken trace somewhere then you’ll have to run a jumper wire between the 2 pads that the trace is supposed to be connected to.
The 2 pads on the switch that have traces attached to them are the 2 pins that should be connected when the button is pressed in. Test those for continuity.
https://zeppelindesignlabs.com/wp-content/uploads/2021/12/Altura-pcb-power.png
Let me know what you find.
Good luck!
I’ll be out of town for the next week, but I’ll try to follow up when I get the chance in a day or 2.
-Brach -
AuthorPosts